
If you haven’t read part one and are new to Marketo, read up on getting started with a flexible Marketo Guided Landing Page Template.
Okay, great! Now that we’ve set up or declared all the switches and options. Now it’s time to tell the template where and how to use them. I won’t get into the HTML of the template, but here’s how you would use them.
Remember from part 1, variables are declared with certain classes and IDs:
<meta class="mktoString" mktoName="Descriptive Name" id="unique-id" default="Default Value">When you want to use them in your template, you’ll call them up by their unique ID by placing the ID within {} and prepending it with $. It would look like this:
I want to insert my variable here: ${unique-id}
The title and description tags (if not there by default).
<!-- As a reminder, this was the variable for the title -->
<meta class="mktoString" mktoName="Page Title" id="page-title" default="Page title">
<!-- End reminder -->

<title>${page-title}</title>
<meta name="description" content="${page-description}" />
Simply put, the ${page-title} will be replaced by whatever the landing page title is – this can be added while creating a landing page. Same for description and same for all variables. This will go in your HEAD part of your template.
The body tag.
<body class="hero-position-${hero-position} hero-theme-${hero-theme} form-position-${form-position} logo-color-${logo-color}">Our variables are just used to output various classes which can be controlled by CSS. I decided to set a few things in the body just so it makes for easier LESS.
Configuring the Hero
Call the variables to the DIV that contains your hero. This will allow you to change the background colour or add a background image. Also, note that we have an ID “theform”. This will be handy when we get to the CTA section.
<div class="hero theme-${hero-theme}" id="theform" style="background-image:url(${hero-bg});background-color:${hero-bg-color};">
<!-- Hero HTML and content here -->
</div>
Note: I’m not getting into simple mktoString to add text, this is more on flexibility. But for the form header you would do something like this:
Fill form. Get Stuff InstantlyThat’s it for the hero and navigation section. Remember the “About Us” section, this is optional. The HTML would look like this:
<div class="section section-about" style="display:${show-about};">
<h3>About Us</h3>
About our wonderful company.
</div>
This simply will allow you to add “none” or “block” as you create a landing page which will allow you to show or hide this section.
Now, publish your template and off to create a landing page, assign it your new template. Your landing page should look somewhat like this: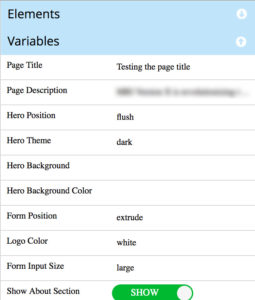
You can add your landing page title, description, and change any copy. You should see the options to change the “layout or design” of your landing page. Nothing will work just yet, unless you’ve uploaded and linked your CSS. We’ll get to that in the next part.
The last part is how you can write your CSS or LESS to work well with your template.
Edit. Read the helpful blog on how to create templates that load in under a second. Also, download sample Marketo & Pardot templates.
Don’t forget you can download three beautiful Marketo optimized templates (that load under a second) for free.
I just created a blog that lists out all the